No Knead Dutch Oven Bread
Highlighted under: Comfort Ideas
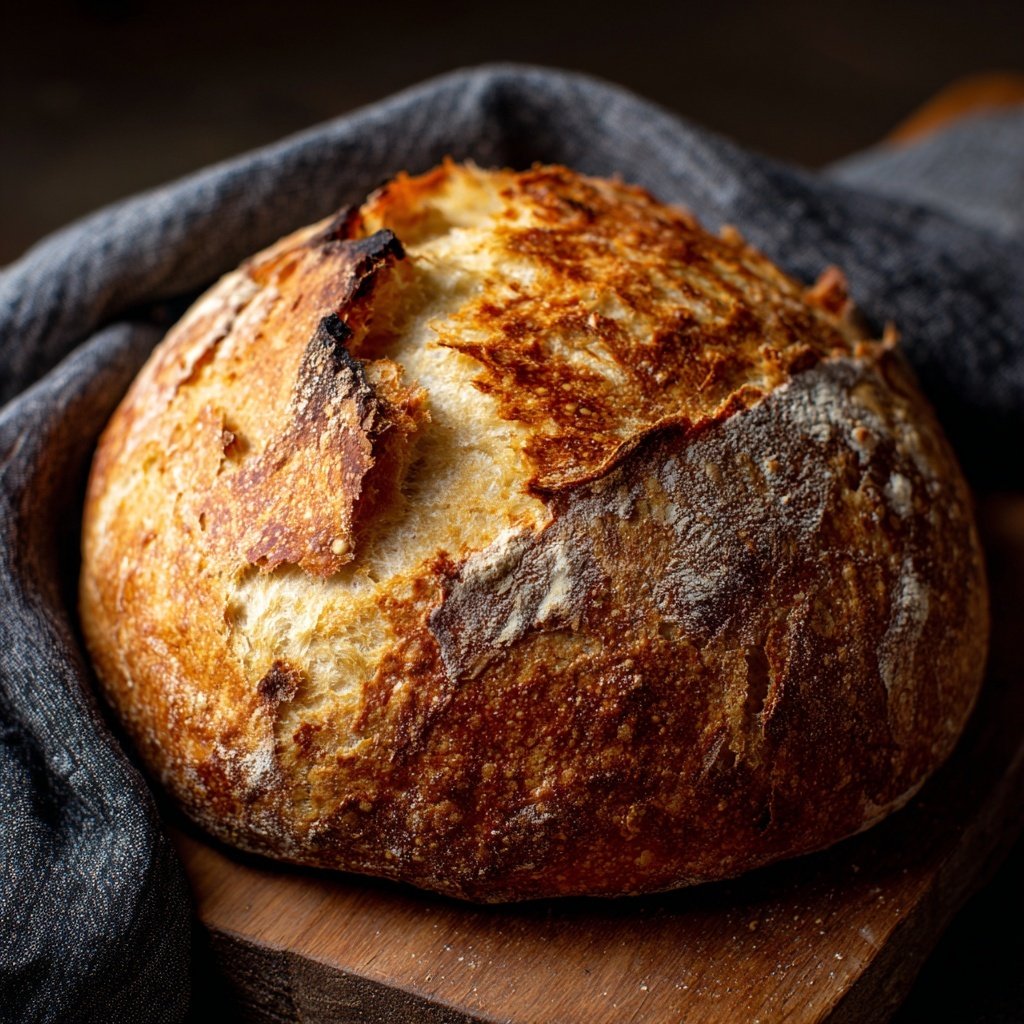
Making bread at home can seem like a daunting task, but I’m here to tell you that it doesn't have to be! With this no knead Dutch oven bread recipe, I found a way to create a beautifully crusty loaf with minimal effort. The secret lies in allowing the dough to rest, which develops rich flavors and improves texture. I love the simplicity of this method, making fresh, homemade bread accessible to everyone—even those with busy schedules.
When I first decided to try making this bread, I was pleasantly surprised by how easily it came together. The process is so forgiving; even if your dough seems too sticky at first, it transforms beautifully after resting. It’s like magic watching the dough rise and then bake into a golden-brown crust with a soft inside. This method has opened up a new world of baking for me, where patience truly pays off.
I also discovered that using a Dutch oven maintains the perfect environment for the bread to steam while it bakes, creating that chewy texture we all crave. Plus, with just four ingredients—flour, water, salt, and yeast—every batch feels satisfying and worth the wait. For added flavor, I sometimes toss in herbs or garlic for a delightful twist.
Why You'll Love This Recipe
- Easy preparation and minimal hands-on time
- Delicious crust with a soft, airy crumb inside
- Perfect for sandwiches or as a side to any meal
The Importance of Resting Time
Resting the dough for 12 to 18 hours is critical in developing the unique flavor and texture of this no-knead bread. During this time, the enzymes in the flour gradually break down, producing a more complex taste profile that can rival that of traditional bread methods. The extended fermentation allows for the formation of gluten, which results in a crusty exterior and a chewy, airy crumb. Setting the dough aside lets these transformations occur without any mechanical manipulation, making this method both science and art.
You might wonder if the weather affects the resting time. In warmer conditions, your dough may ferment faster, so be mindful of checking its progress around the 10-hour mark if your kitchen is particularly warm. Conversely, if it's chilly, you might need the full 18 hours to achieve the bubbly, pillowy texture that's characteristic of this bread.
Shaping Techniques for Better Crust
Shaping the dough correctly is essential for good structure and an inviting crust. After the resting period, the dough will be very soft and sticky. Use a generous amount of flour on your work surface to prevent sticking. When turning the dough out, use a bench scraper if necessary to help gently release it. As you form a ball, be mindful not to overhandle; just tuck the edges toward the center to maintain the dough's gas bubbles, which contribute to the bread's airy interior and developed flavors.
The way you shape the dough before baking influences the final loaf's crustiness. For an even more pronounced crust, consider lightly scoring the top with a sharp knife just before placing it in the Dutch oven. This allows steam to escape and creates a beautiful, rustic appearance while ensuring the bread rises properly during the baking process.
Ingredients
Gather these simple ingredients to get started:
Ingredients
- 3 cups all-purpose flour
- 1 1/4 teaspoons salt
- 1/4 teaspoon instant yeast
- 1 1/2 cups warm water
Make sure everything is measured correctly for the best results!
Instructions
Follow these easy steps to bake your bread:
Mix the Ingredients
In a large mixing bowl, combine the flour, salt, and instant yeast. Pour in the warm water and mix until a shaggy dough forms. Cover the bowl with plastic wrap and let it sit at room temperature for 12 to 18 hours.
Shape the Dough
After the resting period, the dough should be bubbly and expanded. Lightly flour a clean surface and turn the dough out onto it. Gently shape it into a ball, being careful not to deflate it too much.
Preheat the Oven
About 30 minutes before you plan to bake, place a Dutch oven (with the lid) in the oven and preheat it to 450°F (230°C).
Bake the Bread
Once the oven is hot, carefully remove the Dutch oven. Place the dough inside (you can use parchment paper to help transfer it) and cover with the lid. Bake for 30 minutes with the lid on, then remove the lid and bake for an additional 15-20 minutes until golden brown.
Cool and Enjoy
After baking, transfer the bread to a wire rack and let it cool completely before slicing. Enjoy fresh or store in an airtight container.
Take your time when baking and enjoy the wonderful aroma that fills your kitchen!
Pro Tips
- For a more flavorful bread, consider adding herbs or spices to the dry ingredients. This recipe is also versatile
- feel free to experiment with different types of flour.
Ingredient Substitutions
While this recipe calls for all-purpose flour, you can experiment with different flours like bread flour or whole wheat for varying taste and texture. Bread flour has a higher protein content, which can yield a chewier loaf, while whole wheat will add density and a nuttier flavor. If gluten is a concern, a gluten-free all-purpose flour blend can be used, but be sure to add a binding agent such as xanthan gum for better texture.
Salt is essential for flavor but also strengthens the dough's gluten structure. If you're watching your sodium intake, consider using a low-sodium salt option or reducing the amount slightly, though this may impact both flavor and texture. Experimenting carefully with the salt can offer a bread that's both healthier and enjoyable.
Storage and Make-Ahead Tips
This no-knead Dutch oven bread is best enjoyed fresh, but it can be stored effectively to maintain its deliciousness. Once the bread cools completely, wrap it in a clean kitchen towel or place it in a paper bag to help keep the crust crispy. For longer storage, consider slicing the loaf and placing it in an airtight container or freezer bag; it can last up to 3 months in the freezer. When ready to enjoy, simply toast or reheat slices directly in a toaster or oven until warmed through.
If you'd like to prepare the dough ahead of time, you can refrigerate it after the initial rise for up to 3 days. This slow fermentation can enhance flavors even further. Just allow it to come to room temperature and rise for a bit before shaping and baking, which may take around 1 to 2 hours depending on your kitchen's warmth.
Questions About Recipes
→ Can I make this bread without a Dutch oven?
Yes, you can use a baking stone or any oven-safe pot with a lid, but the Dutch oven helps create steam which gives the bread its crusty texture.
→ How long can I store the bread?
The bread can be stored at room temperature for up to 3 days. For longer storage, slice and freeze it.
→ What if my dough is too wet?
It’s normal for this recipe to produce a wet dough. If it’s too sticky to handle, you can sprinkle a bit of flour on your work surface while shaping.
→ Can I add toppings to the bread?
Absolutely! Feel free to sprinkle seeds, herbs, or cheese on top of the dough before baking for added flavor.
No Knead Dutch Oven Bread
What You'll Need
Ingredients
- 3 cups all-purpose flour
- 1 1/4 teaspoons salt
- 1/4 teaspoon instant yeast
- 1 1/2 cups warm water
How-To Steps
In a large mixing bowl, combine the flour, salt, and instant yeast. Pour in the warm water and mix until a shaggy dough forms. Cover the bowl with plastic wrap and let it sit at room temperature for 12 to 18 hours.
After the resting period, the dough should be bubbly and expanded. Lightly flour a clean surface and turn the dough out onto it. Gently shape it into a ball, being careful not to deflate it too much.
About 30 minutes before you plan to bake, place a Dutch oven (with the lid) in the oven and preheat it to 450°F (230°C).
Once the oven is hot, carefully remove the Dutch oven. Place the dough inside (you can use parchment paper to help transfer it) and cover with the lid. Bake for 30 minutes with the lid on, then remove the lid and bake for an additional 15-20 minutes until golden brown.
After baking, transfer the bread to a wire rack and let it cool completely before slicing. Enjoy fresh or store in an airtight container.
Extra Tips
- For a more flavorful bread, consider adding herbs or spices to the dry ingredients. This recipe is also versatile
- feel free to experiment with different types of flour.
Nutritional Breakdown (Per Serving)
- Calories: 200 kcal
- Total Fat: 1g
- Saturated Fat: 0g
- Cholesterol: 0mg
- Sodium: 400mg
- Total Carbohydrates: 44g
- Dietary Fiber: 2g
- Sugars: 0g
- Protein: 6g